
Owning an effective online store is the dream of every business owner. When it comes to ecommerce marketplace and solutions, Shopify is the key player. The company is clearly growing and the infrastructure is even more powerful. Shopify comes with customization options to fulfill the ecommerce need of any business type. It is very interesting to develop an online store with Shopify, but sometimes it may turn out to be a tough job.
Building an online marketplace is a common strategy during these days.Shopify is designed to help you build an online store; it is not designed as a market place. Shopify is an ecommerce platform design to create an individual ecommerce store. Thus, normally you would have one seller and bunch of customers coming to the store to buy products or services. A marketplace is a multiple seller platform where a lot of people add their products. Marketplace development with Shopify is done through a Shopify channel app. There are many problems that users may face while using Shopify. One of the major issue Shopify customers are facing is the difficulty caused with the Shopify market places.
Let’s have a look on the important issues with Shopify marketplace:
1. High cost of setting a Shopify marketplace
To build an online marketplace with Shopify, you need to pay for the overall access to the platform and for additional instruments. You need to purchase a Marketplace app separately and must include some paid integration into functionality. You will also have to pay based on number of user/staff accounts which can increase the cost drastically for marketplace.

2. Unable to create seller account
With Shopify, a seller is unable to create account or upload products. You will need to hire developers to work around to make it happen by create a remote login panel from external source and remotely upload product from the panel.
3. Problems with getting products on marketplace
One of the biggest Shopify problems is how to get products on Shopify marketplace. It becomes stressful to identify the source of this particular issue because the problem could come from your product listings or other marketplaces. You can simply use CSV files to import products but you need to be super careful with it because it could fail with just a single error. Sometimes it’s better for it to fail when you are just importing very few products because you can easily perform the uploading one by one. But the opposite is the case for bulk transfers.
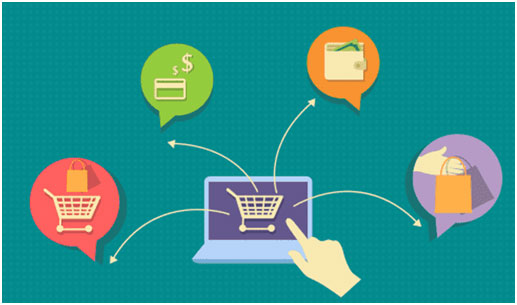
4. Difficulty in creating multivendor marketplace
Shopify does not come with multi-vendor facility by default. If you want to create a multi-vendor marketplace using the Shopify ecommerce platform, you have to choose a Shopify app with subscription plans or work with a development partner to create a custom marketplace functionality on your Shopify store.
You need a lot of independently developed plugins to build marketplace multi-vendor features. This means you will need to align all the plugins to get the maximum features from them and also you need to be good at coding. If not, you will have to hire developers to make the solution work for you. All plugins come at a premium price additional to your regular plan.Also,the process needs high cost and time to sync all the different third-party apps.
5. Issues with multivendor operations
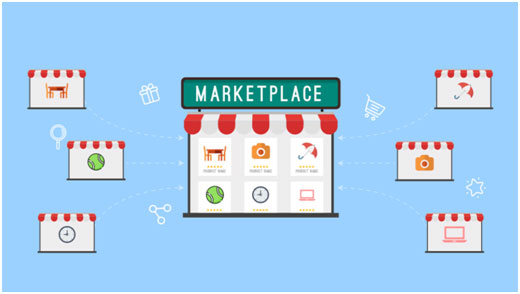
Shopify is not a standalone software to carry out any multi-vendor operations. To convert your store into multi-vendor, you have to buy an extension or plugin. Shopify has a third-party Multi-Vendor Marketplace application to convert your ecommerce store into a fully functional multi-vendor marketplace. Multiple companies are selling plugins for the same. But using plugins for running a large-scale operation like a marketplace can be too complicated and wasteful. Your store could run into all kinds of troubles.
Here are drawbacks of using plugins with Shopify:
- Lack of features. Need multiple apps for every feature which results to slow speed and other performance issues.
- Plugins are more vulnerable to security risks.
- Plugins and apps require continuous updates that lead to more management work.
- Using a lot of plugins can be costly and undermine your budget.
- The website might slow down and need longer loading time.
- Scalability can become a challenging task.
6. Troubles with add-ons
Shopify has an impressive app store, which is great for customizing and advancing your store and marketplace. But adding apps make your monthly costs climb up, which could be a huge problem for small-scale sellers.Themes used in the add-ons also may be incompatible with the theme used in your Shopify backend. There are some Shopify apps which can cause problems with your Shopify themes. The incompatibility issue caused is because of different sets of codes that are struggling with each other.
7. Third party integration issues
Since Shopify is SaaS-based, Shopify store owners need to use SaaS APIs for integration with existing business systems. It is not always possible to integrate an ecommerce store with all of your existing business applications as the APIs are limited. There would be no technical support available from Shopify support teams for this. So, you should have the right team in place, as any integration on the SaaS approach will require much time.
8. Problems in managing marketplaces
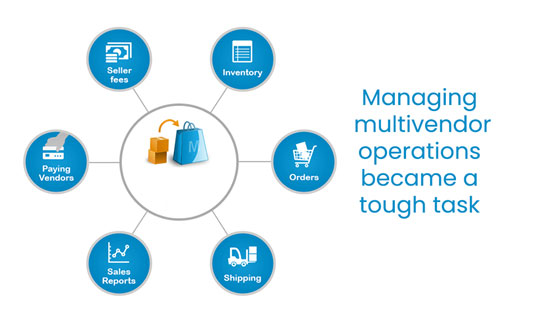
A person who manages distinct online marketplaces experiences much pressure and workload. Being a new Shopify store user, it becomes much difficult to manage everything in your marketplace like getting inventory status, shipping and order management, SKUs check, payments etc.
9. Less public exposure
While marketplaces such as Amazon, eBay, and Etsy have high search volume, customers don’t know if an online marketplace was built on Shopify. They need to search for your site specifically. So, your traffic depends on your own brand, marketing, and exposure.Finding customers for selling products is not a new issue for the beginners of Shopify who are also new to ecommerce. In this concern, it’s good for you to invest in marketing.
10. Customer support issues
Coordinating customer service efforts with your sellers might be the biggest pain point marketplace admins face. If you have a Shopify marketplace, you need to determine your customer service policies and apply them across your website so you can deliver a quality customer experience. It is easy to lose track of customer concerns and complaints if they are being sent back and forth between vendor and admin. Customers who don’t get their issues resolved will likely never return to your marketplace.
11. Lack of proper technical support
Shopify also lacks proper technical support when it comes to manage the market places. Reaching out the technical support team has become a headache for most marketplace customers. There is no proper channel to contact the technical support team easily, all the way of contacts given by them may not work properly at all times. Sometimes you need to hire another technical support team to solve the issues.

While Shopify might not offer default marketplace solutions to ecommerce stores, it is still a powerful eCommerce platform that can be used to create a sleek, professional online marketplace. Marketplaces present a number of unique issues that single vendor eCommerce stores don’t have to face. Shopify does offer tools that you can use to ease these pain points, but it may make the most sense to work with a development partner to craft custom solutions that perfectly match your needs.
How to Create an Awesome Online Market Place?

An online marketplace is a platform to find different products from different vendors, shops, or persons showcased together. Building an online marketplace is a profitable option, as it does not need you to hold any inventory. Without developing infrastructure to hold the stock you can run a successful business. If you’re planning to start an online marketplace website this is the right time to do it. Not only will it help you establish an almost mandatory online presence but will help you access a much larger customer base.
Let’s go through the important steps for starting an online marketplace:
Read more on how you can find niche for your online business.
1. Research well for online business
When you need to start your online marketplace you have to find a niche. Choose one that works for you or is already your area of expertise. If you fall in the latter category, you are already halfway through your research stage. If not, you have to conduct a survey to find the item that holds considerable demand in the market and then begins.

This holds true for a new starting business as well as for new product or service launch. Picking a niche, and then understanding the buyer’s persona is crucial for a business to hit the right note with its customer section.
2. Develop your marketplace idea
Every project starts with a concept and an ecommerce marketplace is no exception. Before thinking about a business model, what software to choose,how to attract vendors and customers, you have to invent your marketplace idea and finetune it. Make sure your marketplace will not create problems for both your customers and vendors.

Always have a look on what your competitors are doing. Try to discuss your idea with others, listen to the people’s opinions and polish your idea based on the feedback. Proving the demand for your idea is really one of the key aspects of the question about how to build a successful multi-vendor marketplace.
3. Choose the suitable business model for you
Your business model is the revenue-generating approach you’re taking, while a business plan is an in-depth document that outlines your future and how you’ll go about achieving that future. You streamline the process of choosing and evaluating a business model via business model templates and canvases. It doesn’t matter your industry and background, it's a good idea to design a viable business model.

4. Plan and execute your market place operations
Creating an online marketplace website is an initial thing but managing a successful marketplace business is something completely different. Even a regular ecommerce business gets complex at times due to the number of operations you have to deal regularly. Marketplace operations can get more difficult than that due to the nature of two-sided platforms. You need to execute well developed plans for managing everything in your marketplace.
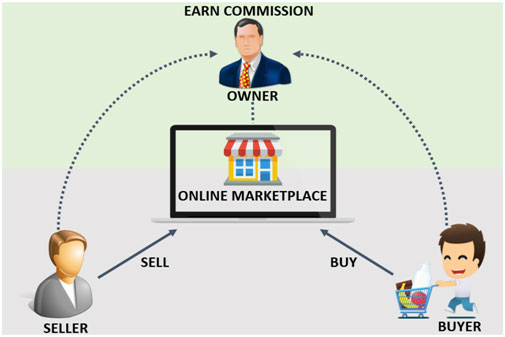
This includes everything from acquiring new sellers and helping them get started to keeping existing sellers happy and successful. As a marketplace owner, you won't usually have to deal with your own inventory. But you still need processes in place to manage products sold by your sellers. You need specialized marketplace payment gateways to allow customers to purchase from multiple sellers at once and split payments at checkout. Make sure you know what payment gateways you'll use and how exactly you'll use them. You will also need a successful plan for managing inventory, orders, logistics and shipping as well as marketing processes.
5. Building an online market place

Building a new marketplace platform from scratch is an option, but doing that would take time and money you'd probably be more willing to use on growth. You need to spend most resources for building all kinds of basic features your marketplace may need.Building an online marketplace with existing software has many benefits compared to coding from scratch. Using an existing online marketplace software is almost always the fastest, easiest, and most cost-efficient way to launch your business.
6. Select the best ecommerce marketplace platform
To create a sustainable and advanced onlinemarketplace platform, it is important to choose the right software and framework to design your marketplace. Proper tools and their integration are necessary to make a more maintainable and scalable online platform. With the help of a successful ecommerce platform, you can easily develop your own online marketplace.

There are a variety of ecommerce software options available in the market for developing an online marketplace. The 5 best ecommerce market place platforms are discussed below:
-
Shopygo
Shopygo is another popular ecommerce software for building an online store. It has the great Multi-vendor Marketplace facility to convert your ecommerce shop into a marketplace. With the Multi-vendor Marketplace option, you can build a fully functional marketplace to add multiple vendors onto your website. Shopygo marketplace is much affordable It allows you to add unlimited vendors, unlimited products, and also allows you to sync products from other eCommerce stores. Combining this with the features of Shopygo, you’ll get a robust admin dashboard with powerful features and options.
-
WooCommerce
WooCommerce is one of the industry’s best ecommerce platforms for multivendor marketplaces. It works side-by-side with WordPress as a plugin which means it uses all the features and flexibility of WordPress to create the best possible website. It can integrate with other useful WordPress plugins as well, like WC Vendors, to build your multivendor marketplace. WC Vendors supports multiple WooCommerce extensions to add more features on your eCommerce store.
-
BigCommerce
BigCommerce comes with a multi-vendor marketplace application to convert your eCommerce store into a fully functional multivendor marketplace. Like any other marketplace, you can allow the vendors to sign up via your BigCommerce store. You can also add the sellers yourself manually.
-
CS-Cart Multi-Vendor
CS-Cart Multi-Vendor is a full-fledged multivendor marketplace platform built specifically to create your own marketplace. It doesn’t need any other applications or extensions to run the marketplace which means you’ll get all the features of a multivendor platform right out of the gate. It allows the vendors to register on your eCommerce site and get access to a dashboard.The dashboard shows statistics, income status, number of orders, sales, tax details, and more.
-
Magento
Magento is a popular eCommerce platform with amazing features and addons. It has an extension called Marketplace that helps you create a powerful multivendor eCommerce store. Marketplace integrates with Magento to allow vendors to register on your website. Once you approve the vendor’s request, they can go ahead and add their products. Marketplace offers a complete dashboard of their own to your vendors.
7. Launch your online marketplace

Now you can launch your market place, run tests, such as private in-store transactions, to ensure everything operates as intended before launch. Every successful online business becomes that way by adapting to the ever-changing nature of their market. This means staying informed with market is the key to discover the most profitable growth channels that your business should follow.
Customer traffic may seem slow at launch of your marketplace, but you can influence your rate of growth by proper marketing strategies and making data-driven decisions.Transaction data and other business metrics can tell you which aspects of your marketplace are most profitable, and which need attention.
To launch your own marketplace with Shopygo, you can simply follow the steps given below. Here you will get the complete guide for starting your ecommerce platform:
1. Visit Shopygo.com
For getting started with Shopygo, go to Shopygo.com and click on the Start a store option on the top right corner of the homepage. Now you will be directed to the registration page.

2. Register your store on Shopygo
This is the store registration stage where you need to add all the given basic details to start your online store with Shopygo.

Provide the following details to register with Shopygo:
- Country Code: Add your country code for the mobile number you are using for your store
- Mobile Number: Give the mobile number you are using for your store operations here. Make sure the mobile number is an active one as you will require this number as a medium for logging into your account always and also to conduct your online operations.
- Email Address: Provide an active email address for your store here, we will be using this mail id as a medium to contact you and to update all the store operations.
- Password: Provide a strong password for logging into your online store and keep this password protected. You will require this password along with the provided mobile number for logging into your store always.
- Your store name: Add your store name here in the section, this will be your domain name that appears on your online store website address. i.e. - yourstorename.shopygo.com. If it says you store name is not available, that means already a similar name exists with system, so kindly make some changes to the name and add again.
Verify all the details added and remember not to note down the details added in this section. The mobile number and password provided here will be used for logging into your online store.
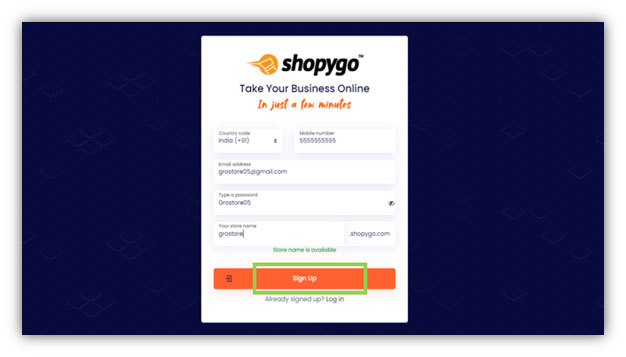
After adding all the details mentioned above, click on Sign Up button to proceed. By signing up successfully you have completed your store registration with Shopygo.
3. Verify with your OTP
After clicking on Sign Up, an OTP will be sent to the mobile number you have provided. Then you will be directed to OTP verification page. Sometimes it will take few minutes to get the OTP in your number, so you need to wait until you get the OTP. After getting it, you need to enter the OTP here in page and click on Verify OTP button.
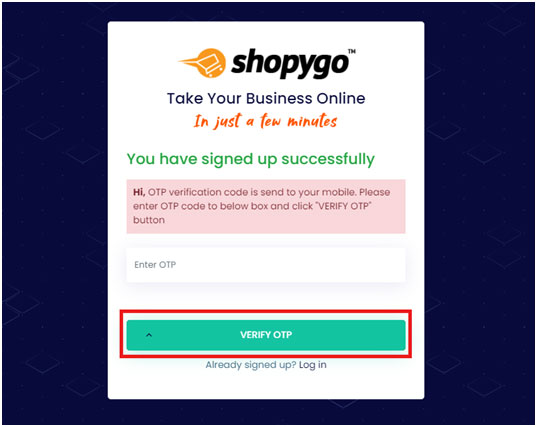
After successful verification of OTP, you will be directed to the next page to add further details of your store.
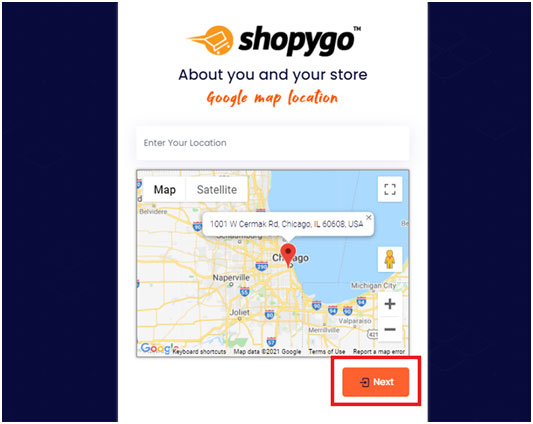
4. Add Location of your Store
In next page appears you need to enter the location of your store. You can either enter your location or add the Google map location here. After adding the location details, then click on Next button to proceed.
5. Add your Complete Address
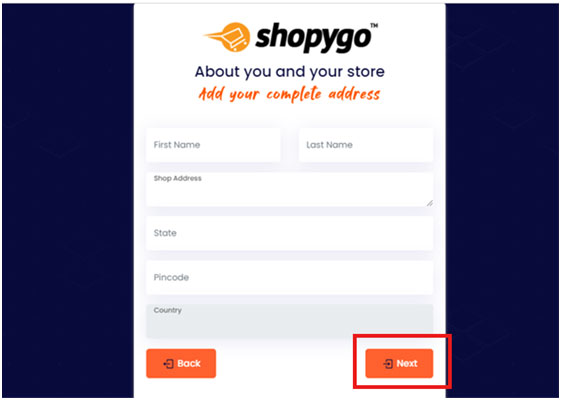
After adding your location, you will be directed to the next page where you can add further details about you and your store. Here you need to add the following details:
- Name
- Shop Address
- State
- Pin Code
- Country
After adding the above details, click on Next button below to proceed.
6. Add more about your Shop
After adding your complete address, you can add more about your shop in the next page. You can update your email id and shop subdomain name. Then you can add the category of our shop. Select the shop category from the option given and click on Save to proceed.
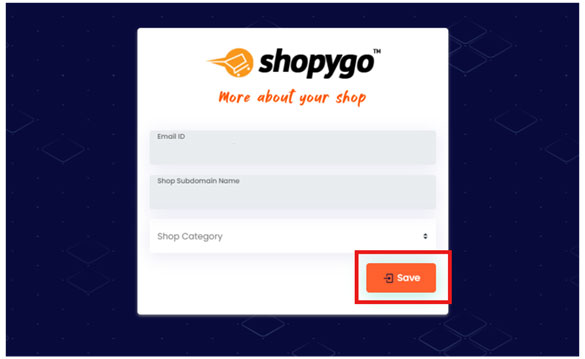
Thus, you completed adding the details of your store with Shopygo. So now the pricing page will appear. You need to confirm your required pricing plan from the available options.
7. Confirm your Shopygo Plan
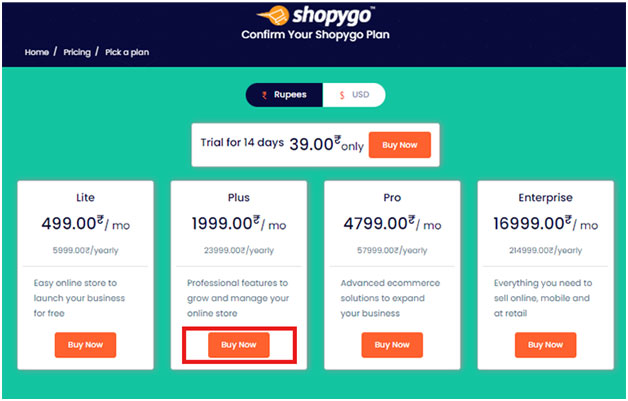
Here in the pricing plan page that appears you need to pick a Shopygo plan that is affordable for you.
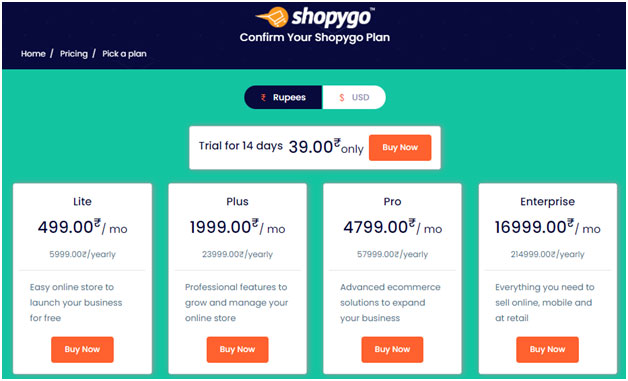
You can switch and view the pricing value in the currency you prefer, either in Rupees or in USD
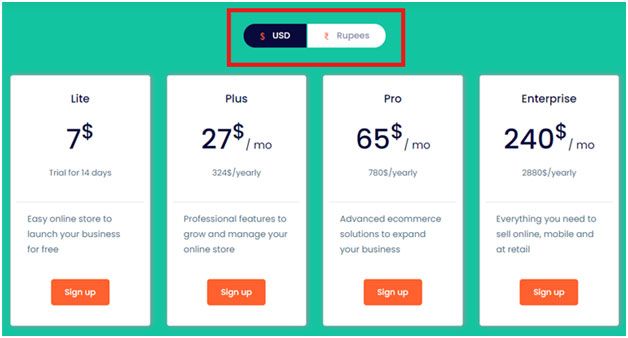
You can choose the right plan suitable for your store from the following 4 plans provided by Shopygo:
- Shopygo Lite Plan
- Shopygo Plus Plan
- Shopygo Pro Plan
- Shopygo Enterprise Plan
You can also get a Trial plan for 14 days, with the features of Shopygo Lite plan
Scroll down the page and there you can find and compare all the features provided in each of the Shopygo plans
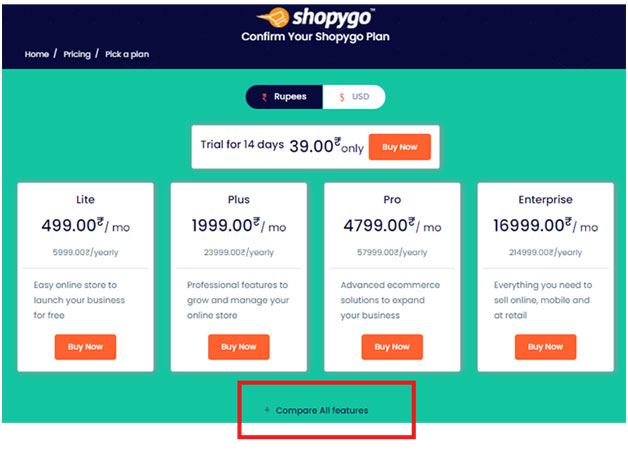
Go through the features and select a plan that provides enough features for your required online store.
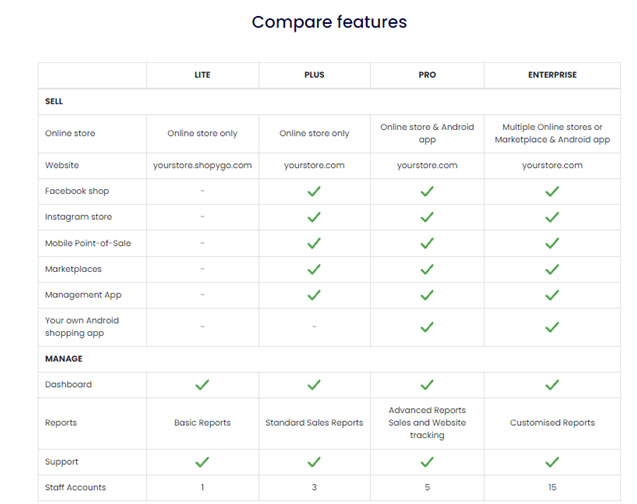
To proceed, click on Buy Now option corresponding to any plan that is right for you.
After selecting a Shopygo plan, you will be directed to Billing and Payment page.
8. Billing and Payment process
This page is divided into two sections, in the left section you can view and edit the billing details. Check all the info and ensure all of them are correct.
Check and verify the following details:
- Country Name
- Your Name
- Shop Address
- Email Address
- Pin Code
- Mobile Number
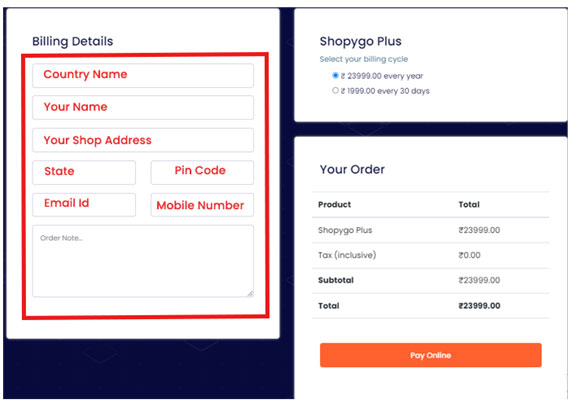
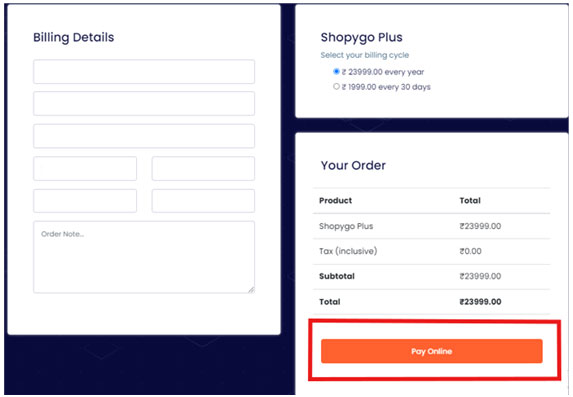
In the right section of the page, you can view the order details, i.e., the pricing of the plan you have chosen.
Click on Pay Online button to proceed to the payment of your Shopygo plan.
9. Select the Mode of Payment
Now the mode of payment window appears in the page. You can proceed your plan payment with different payment options like, Card, UPI, Wallets, Net banking etc. with Shopygo.
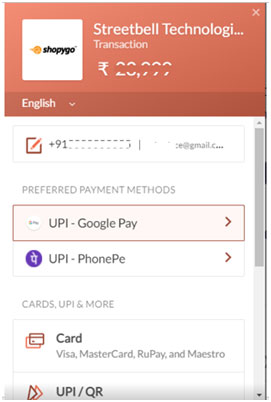
Select your payment method, enter the details and click on Pay button to complete the payment.
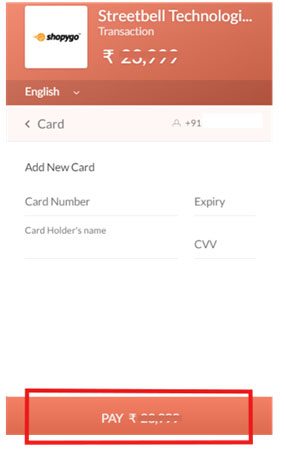
Complete your payment with the confirmation from your bank account and proceed.
10. Order Processing and Confirmation
After your payment is done, your order will start processing. It will take few moments to complete the order. The time taken for processing your order will be based on the flow of payment operations with your bank.
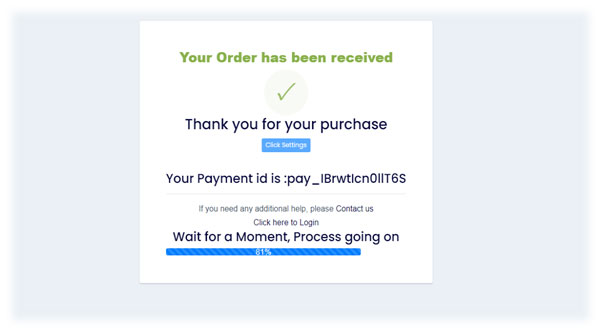
After a moment, your order will be processed completely, and an order confirmation window appears as below.
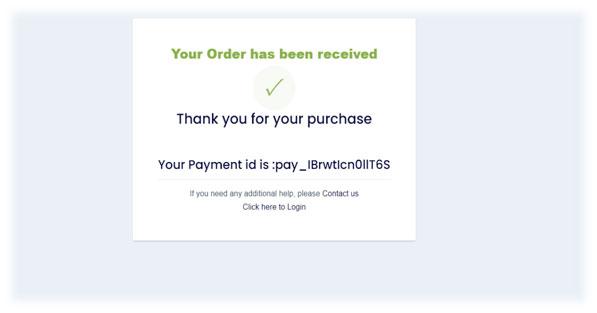
You can find your payment id here, for any future reference. You have successfully started your online store with Shopygo. Now you can easily Login to your store dashboard to start your online store operations.
Login with your mobile number and password to Login to your online store.
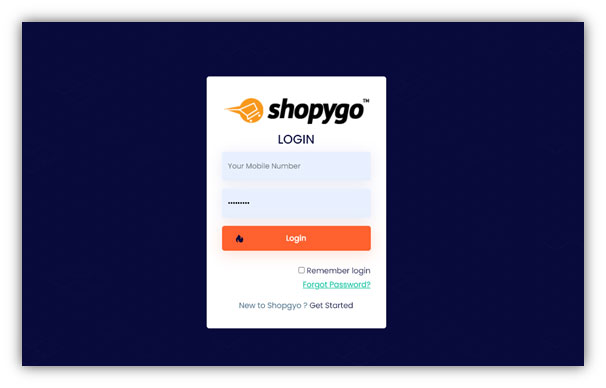
11. Add products to your online store
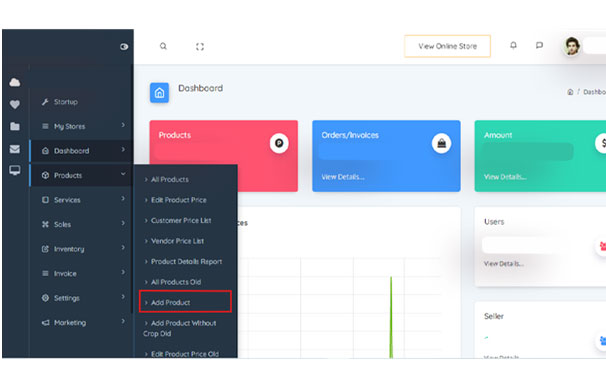
Login to your dashboard and go to the Products section. Simply select the Add product option from it.
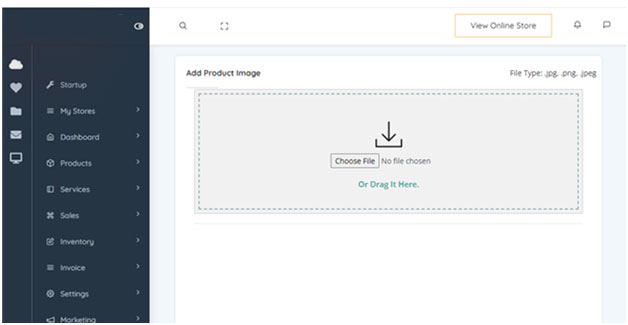
Choose your product image and upload it in the new page appears. After adding the image select and crop the image to continue.
To upload the product, you can add the product name, description, category and pricing details as the basic product details to appear in your online store.
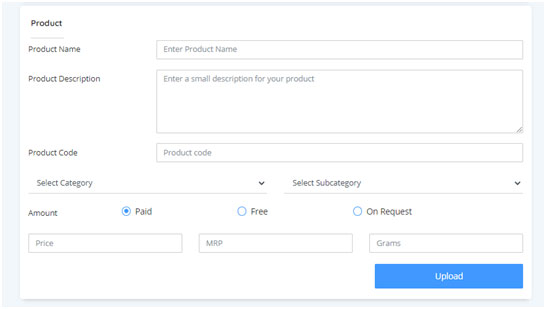
After adding the above details, you can simply click on Upload button to add the product to your store. Thus, your product will be successfully uploaded.
In the All products section of your dashboard you can find the uploaded product.
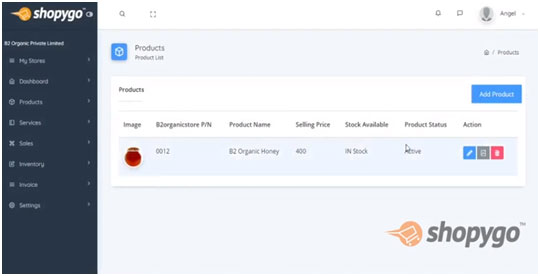
You can simply add unlimited products to your online store by continuing with these steps.


