Google Analytics is a powerful tool that delivers crucial data on your website and visitors. It is one of the most popular tools for digital marketers. With more ecommerce companies utilizing it, it's also one of the most popular tools out there. The tool gives you access to a lot of statistics about your site's users.
Shopify has integration with enhanced Ecommerce events in Google Analytics, but key steps are missing in this shopping stores. Analytics allow you to get closer to your clients and learn about their requirements. Google Analytics, helps you see how many people are visiting your business in real time and where they're coming from.
The complexity with Shopify and Google Analytics is a common issue mostly due to the usage of a mix of non-Shopify landing pages and checkout pages, where the cross-domain tracking is set up incorrectly.These issues are extremely easy to spot and resolve. In most Shopify stores, allecommerce data is tracked incorrectly in Google Analytics.
The complexity of Google Analytics in Shopify stores
If you are using Shopify and Google Analytics then there some areas that you should definitely take a look at, to make sure that you are collecting data in the right way. Some of the complexities you may face with Google Analytics on Shopify stores are as follows:
1. Improper ecommerce tracking
Shopify stores are prone to errors in the Google Analytics ecommerce tracking, especially when customizations are done. Errors from a different script may occasionally interfere with the Google Analytics installation, preventing data from being transferred to Google Analytics. In this case the transactions will be not be reported in Google Analytics.
2. Unable to track product list views
Shopify stores fail to sync the product list views with Google Analytics. You'll be able to better promote the top products and alter page layouts if you know which product listings boost sales. This product list click information is also being used by certain stores to power 'customers also viewed' suggestions.
3. Issues in order volumes
Some Shopify store orders aren't tracked in Google Analytics, owing to the fact that the customer never sees the order confirmation page. This is becoming more of a problem with Shopify stores' mobile checkouts.
4. Demographics tracking issues
Using Google Analytics' demographics monitoring feature, you can collect reliable information about user interests as well as demographics for advertising and analysis. It is a one-minute setup job, so this is a simplest thing to fix, but the issues in tracking may cause a lot of trouble in getting proper analytics of your store.
5. Google Analytics data sampling
Google Analytics reports are not sampled by default, however they may contain sampled data if your account receives a lot of sessions or if segments are used. In this case, some transactions may not report correctly.
6. Missing checkout steps
You can examine how clients exit at each level of your checkout funnel by tracking the checkout steps (even on Shopify's one page checkout).This data is not integrated easily with Google Analytics. You can analyze this data by delivery options and payment methods to see if one is preventing you from completing the purchase.
7. Unable to track Add-to-cart operations
You can analyze customer shopping behaviour and retarget cart abandoners by tracking which products are added to cart. Setting up Google Analytics can be tricky here with Shopify. But when you have it set up, you will gain a ton of valuable information very quickly.
Using Google Analytics is necessary, but it is said that using Shopify analytics available on a Shopify premium plan can give your Shopify store the edge. Because integrating your Shopify store with Google Analytics cannot be done easily. Also, Shopify analytics comes with a premium paid plan which is not affordable to all businesses.
Here comes the importance of having a user-friendly platform like Shopygo to start your online store. You can easily setup Google Analytics for your business with a Shopygo Store. Learn how to setup Google Analytics for your online store.
How to Setup Google Analytics for Your Online Store Easily?
1. Set up Google Tag Manager
Google Tag Manager is a free tag management system provided by Google. It takes all the data on your website and sends it to other platforms such as Facebook Analytics and Google Analytics.
First, you must create an account on the Google Tag Manager dashboard. Enter an account name and click continue. Then set up a container, which is a bucket containing all of the “macros, rules, and tags” for your website, according to Google. Give that container a descriptive name and select the type of content it’ll be associated with.
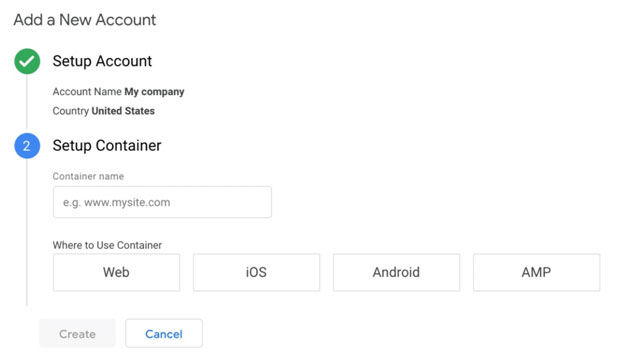
After that click create, review the Terms of Service, and agree to those terms. The container's installation code snippet will subsequently be handed to you. It is a code to paste into your website’s back end for managing tags. The two snippets of code should be copied and pasted onto every page of your website.
2. Setting up Google Analytics
For this you need to create a Google Analytics account by signing up.
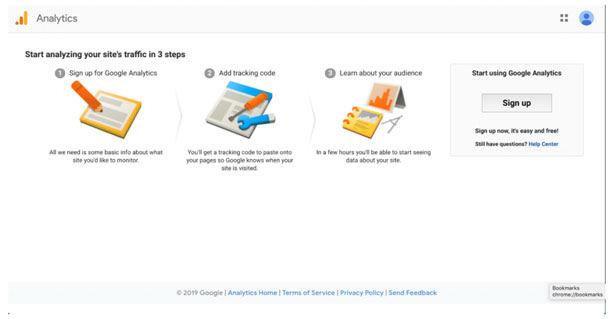
Enter your account name, website name, and the website URL. Also, you can select the website’s industry category and the time zone you want the reporting to be in. Accept the Terms and Services and get your tracking ID. The tracking ID is a numerical sequence that instructs Google Analytics to deliver you analytics data. It's time to move on to the following stage now that you have the tracking ID.
3. Setting up Analytics Tag on Google Tag Manager
Click the Add a new tag button on your Google Tag Manager dashboard.
Then you'll be directed to a page where you can design your own website tag.
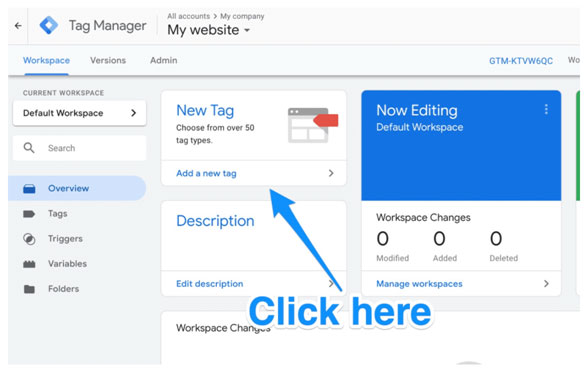
On the page, you can customize two areas of your tag:
- Configuration - What will happen to the data gathered by the tag?
- Triggering - What kind of information do you wish to gather?
Choose the sort of tag you wish to create by clicking the Tag Configuration button. To create a Google Analytics tag, select "Universal Analytics" from the drop-down menu.Following that, you'll be able to select the type of data you'd like to monitor. Then select "New Variable" from the dropdown menu under "Google Analytics Setting." You'll be brought to a new window where you can input your tracking ID for Google Analytics. This will send data from your website directly to Google Analytics.
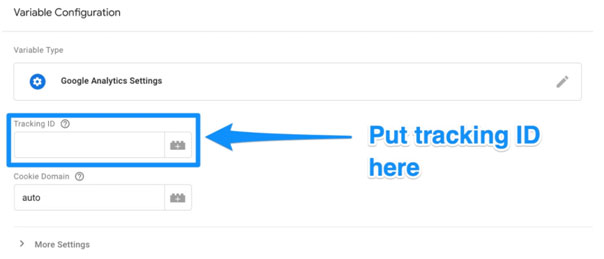
Next, select the data you wish to send to Google Analytics in the "Triggering" section. To go to the "Choose a trigger" page, click on the Triggering button. Select All pages from the drop-down menu to send data from all of your web pages. Following that, your new tag setup should look something like this:
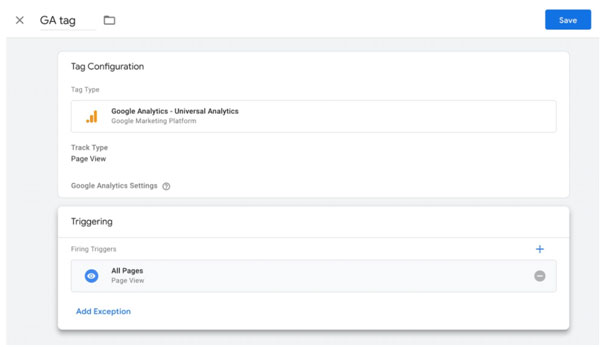
Then press the Save button. You now have a new Google Tag tracking set up, and data from your website will be sent to your Google Analytics page!
4. Set up goals of Google Analytics
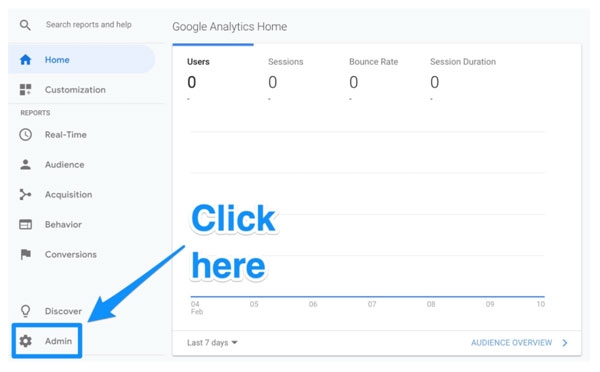
You must define goals on your Google Analytics dashboard in order to achieve success. To begin, click the Admin button in the lower left corner.
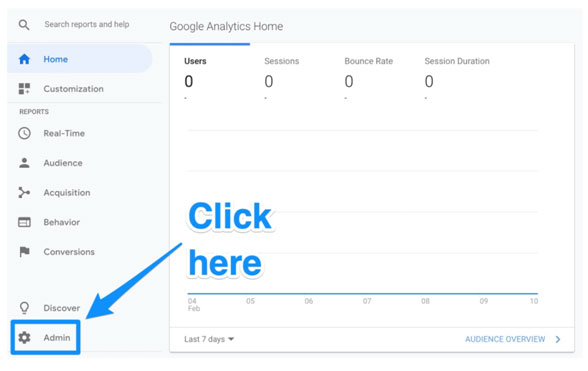
You'll be redirected to a new window where you can find the "Goals" button. To create a new goal, click that button to proceed to the "Goals" dashboard.

You can then check through the various goal templates to determine if one of them matches your intended aim. You must also select the type of goal you desire. Save the goal after you're finished, and Google Analytics will begin tracking it for you!
5. Google Search Console linking
Google Search Console is a useful tool for gaining search metrics and data for marketers.
You can use it to:
- Check your website's search rate
- See when Google examines your website
- See what internal and external pages link to your website
- Check the keyword searches you rank for in search engine results
To get started, go to the main dashboard and click the Admin button in the lower left corner.
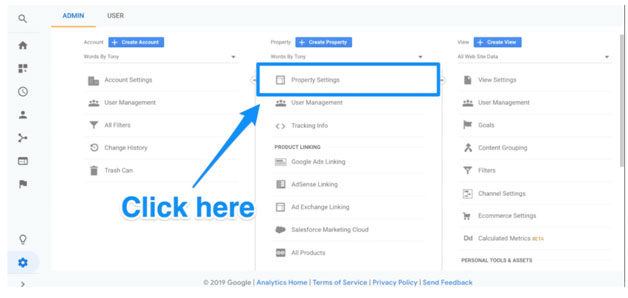
Then, in the middle column, select Property Settings.
Scroll down and select Adjust search console from the drop-down menu. You may begin the process of registering your website with Google Search Console right here. You'll be taken to this page after clicking the Add button. Click the Add a site to Search Console button at the bottom.

You can add a new website to Google Search Console from this page. After that, click Add and type in the name of your website. To add the HTML code to your site, follow the instructions. Click "Save" after you're finished, and you should be directed back to Google Analytics!
You can easily integrate Google Analytics with your Shopygo store. You will be given an ID or code after creating an account with Google's Analytic service, as described above. This will be required in order to link your Shopygo store to Google Analytics. You'll acquire a tracking ID from Google Analytics that looks like this: UA-XXXXX-YY. After you've obtained this Analytics ID, you may use it to integrate Google Analytics with your store. This Analytics ID number can be added to your Shopygo store. As a result, your store will be linked to Google Analytics' ecommerce tracking.
You won't view your data immediately away, so come back later to see your Google Search Console data. There are a variety of things you can do with Google Analytics now. You can access the entire world of data analysis and web marketing at your fingertips.
If you want your store to be smoothly integrated with Google Analytics, you need to create a seamless ecommerce store. You can easily build an integrated ecommerce platform with Shopygo through the following steps:
1. Visit Shopygo.com
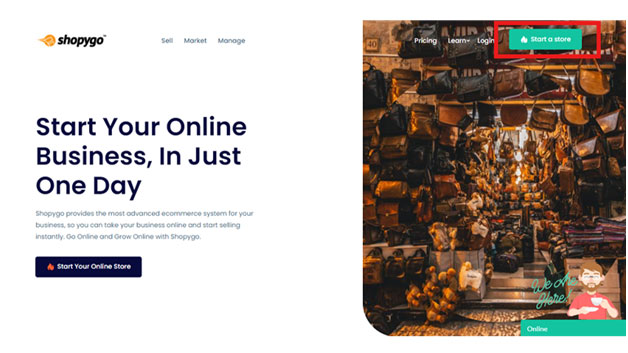
For getting started with Shopygo, go to Shopygo.com and click on the Start a storeoption on the top right corner of the homepage. Now you will be directed to the registration page.
2. Register your store on Shopygo
This is the store registration stage where you need to add all the given basic details to start your online store with Shopygo.
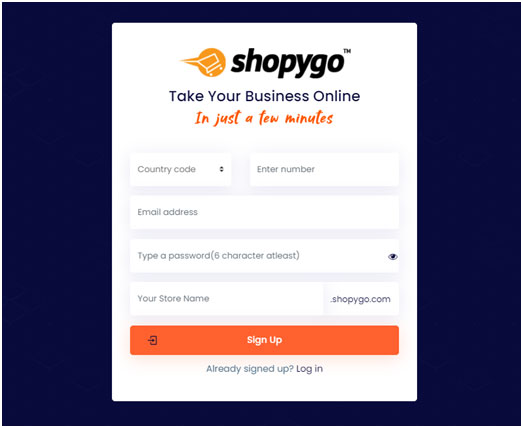
Provide the following details to register with Shopygo:
- Country Code: Add your country code for the mobile number you are using for your store
- Mobile Number: Give the mobile number you are using for your store operations here. Make sure the mobile number is an active one as you will require this number as a medium for logging into your account always and also to conduct your online operations.
- Email Address: Provide an active email address for your store here, we will be using this mail id as a medium to contact you and to update all the store operations.
- Password: Provide a strong password for logging into your online store and keep this password protected. You will require this password along with the provided mobile number for logging into your store always.
- Your store name: Add your store name here in the section, this will be your domain name that appears on your online store website address. i.e. - yourstorename.shopygo.com. If it says you store name is not available, that means already a similar name exists with system, so kindly make some changes to the name and add again.
Verify all the details added and remember to note down the details added in this section. The mobile number and password provided here will be used for logging into your online store.
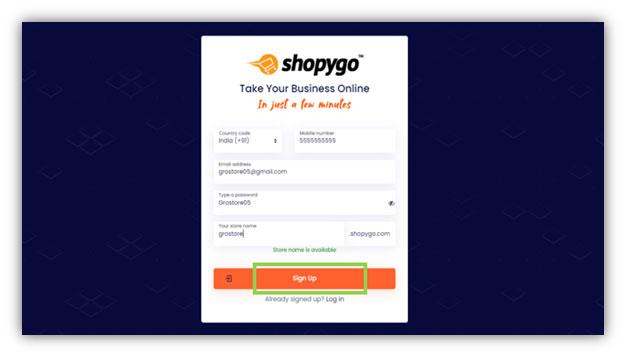
After adding all the details mentioned above, click on Sign Up button to proceed. By signing up successfully you have completed your store registration with Shopygo.
3. Verify with your OTP
After clicking on Sign Up, an OTP will be sent to the mobile number you have provided. Then you will be directed to OTP verification page. Sometimes it will take few minutes to get the OTP in your number, so you need to wait until you get the OTP. After getting it, you need to enter the OTP here in page and click on Verify OTP button.
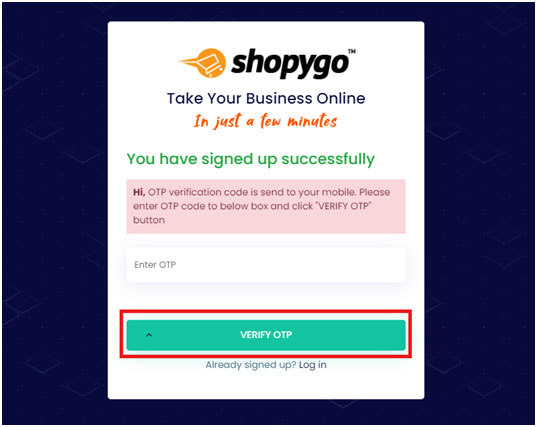
After successful verification of OTP, you will be directed to the next page to add further details of your store.
4. Add Location of your Store
In next page appears you need to enter the location of your store. You can either enter your location or add the Google map location here. After adding the location details, then click on Next button to proceed.
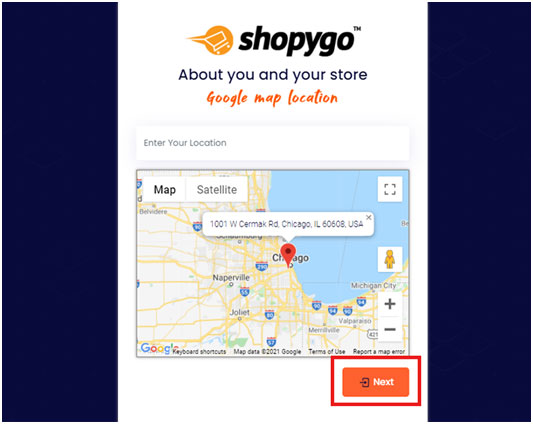
5. Add your Complete Address
After adding your location, you will be directed to the next page where you can add further details about you and your store. Here you need to add the following details:
- Name
- Shop Address
- State
- Pin code
- Country
After adding the above details, click on Next button below to proceed.
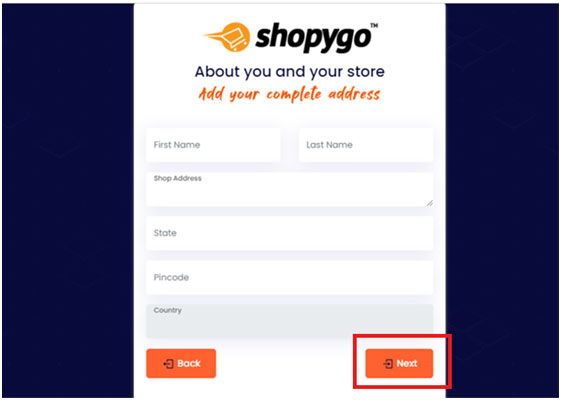
6. Add more about your Shop
After adding your complete address, you can add more about your shop in the next page. You can update your email id and shop subdomain name. Then you can add the category of our shop. Select the shop category from the option given and click on Save to proceed.
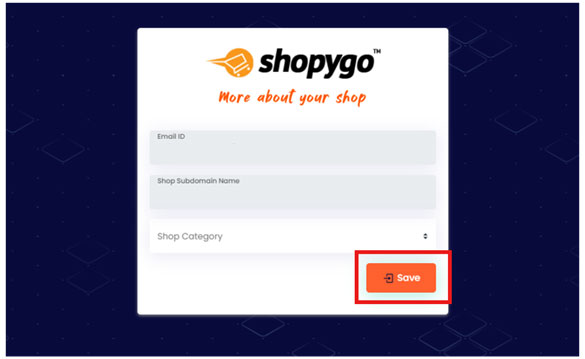
Thus, you completed adding the details of your store with Shopygo. So now the pricing page will appear. You need to confirm your required pricing plan from the available options.
7. Confirm your Shopygo Plan
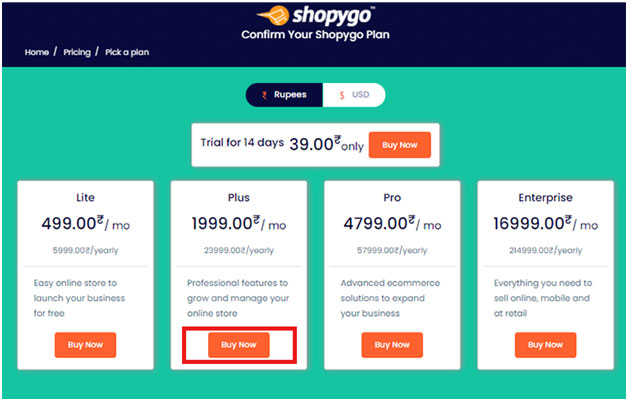
Here in the pricing plan page that appears you need to pick a Shopygo plan that is affordable for you.
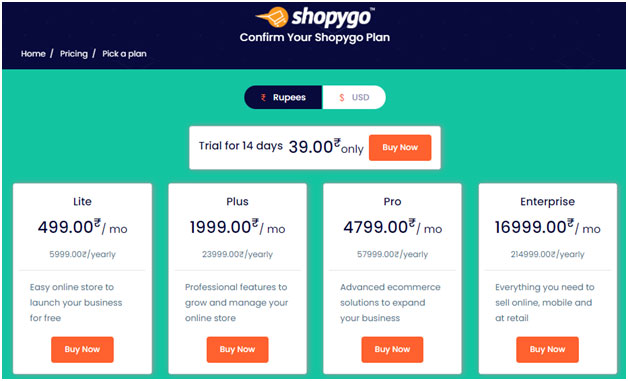
You can switch and view the pricing value in the currency you prefer, either in Rupees or in USD
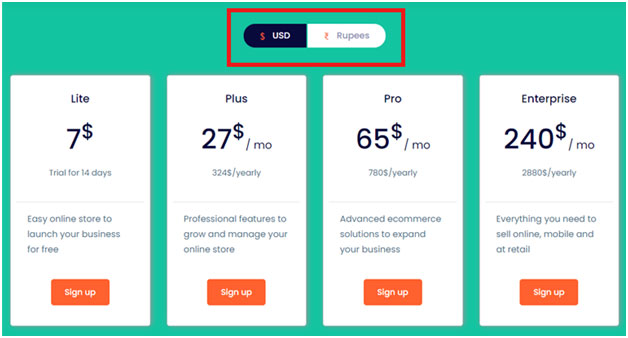
You can choose the right plan suitable for your store from the following 4 plans provided by Shopygo:
You can also get a Trial plan for 14 days, with the features of Shopygo Lite plan
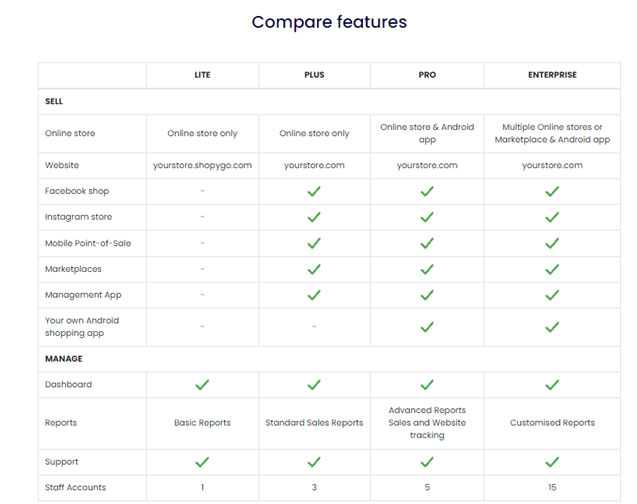
Scroll down the page and there you can find and compare all the features provided in each of the Shopygo plans
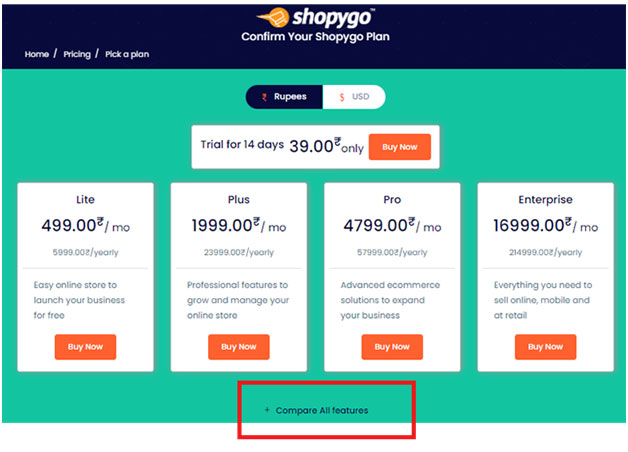
Go through the features and select a plan that provides enough features for your required online store.
To proceed, click on Buy Now option corresponding to any plan that is right for you.
After selecting a Shopygo plan, you will be directed to Billing and Payment page.
8. Billing and Payment process
This page is divided into two sections, in the left section you can view and edit the billing details. Check all the info and ensure all of them are correct.
Check and verify the following details:
- Country Name
- Your Name
- Shop Address
- Email Address
- Pin Code
- Mobile Number
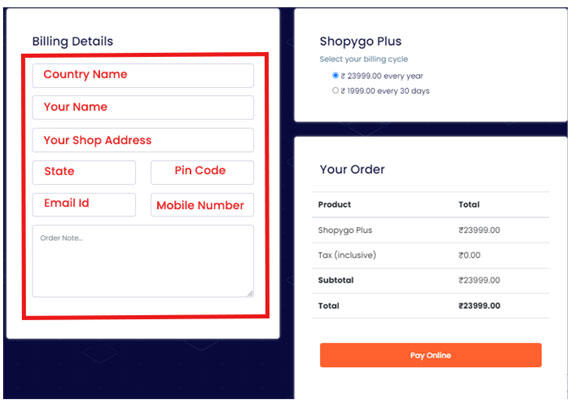
In the right section of the page, you can view the order details, i.e., the pricing of the plan you have chosen.
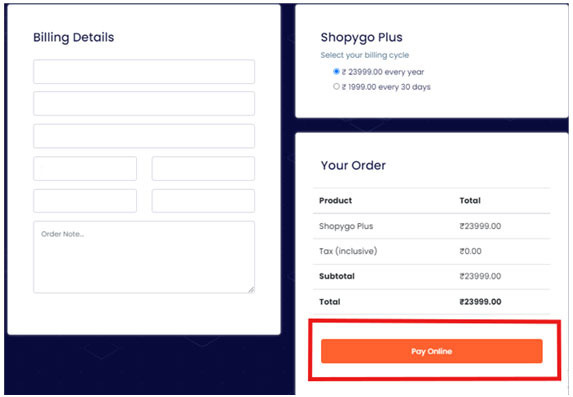
Click on Pay Online button to proceed to the payment of your Shopygo plan.
9. Select the Mode of Payment
Now the mode of payment window appears in the page. You can proceed your plan payment with different payment options like, Card, UPI, Wallets, Net banking etc. with Shopygo.
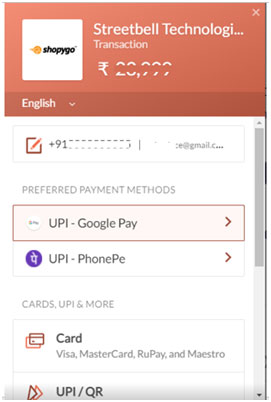
Select your payment method, enter the details and click on Pay button to complete the payment.
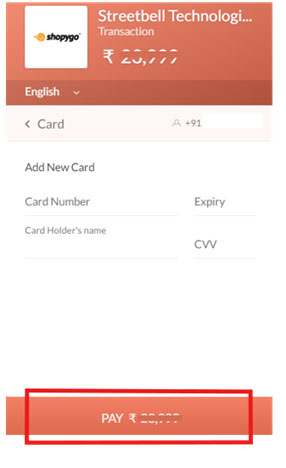
Complete your payment with the confirmation from your bank account and proceed.
10. Order Processing and Confirmation
After your payment is done, your order will start processing. It will take few moments to complete the order. The time taken for processing your order will be based on the flow of payment operations with your bank.
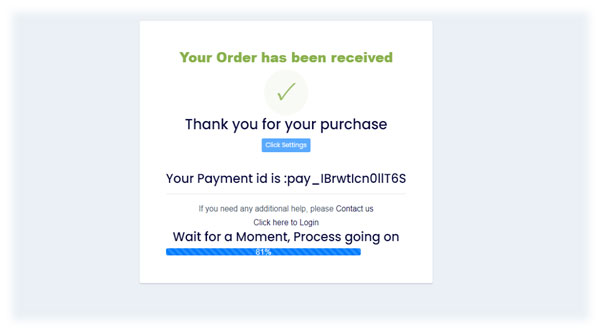
After a moment, your order will be processed completely, and an order confirmation window appears as below.
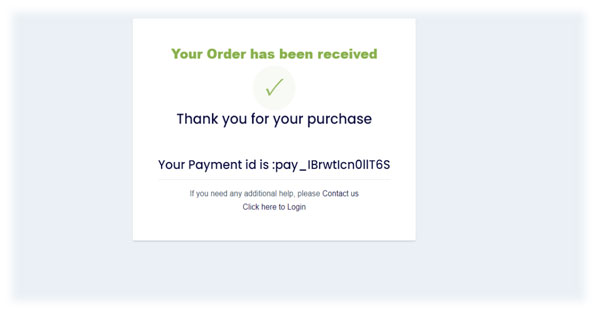
You can find your payment id here, for any future reference. You have successfully started your online store with Shopygo. Now you can easily Login to your store dashboard to start your online store operations.
Login with your mobile number and password to Login to your online store.
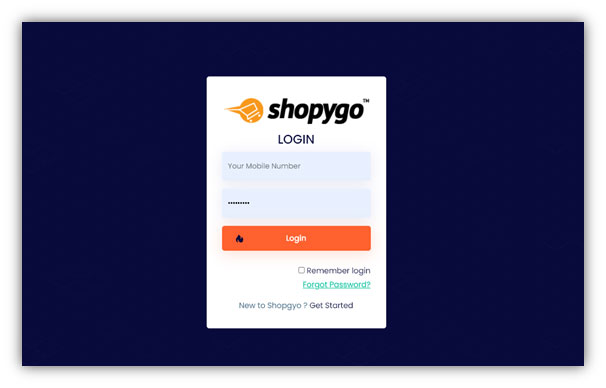
11. Add products to your online store
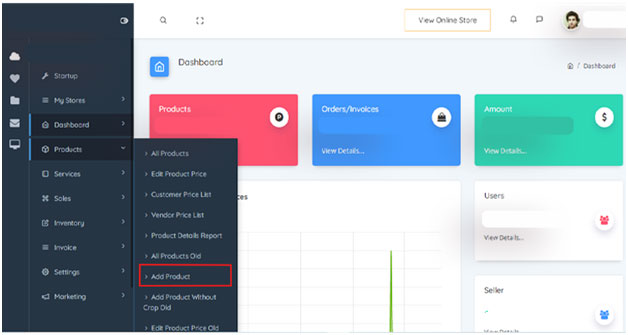
Login to your dashboard and go to the Products section. Simply select the Add product option from it.
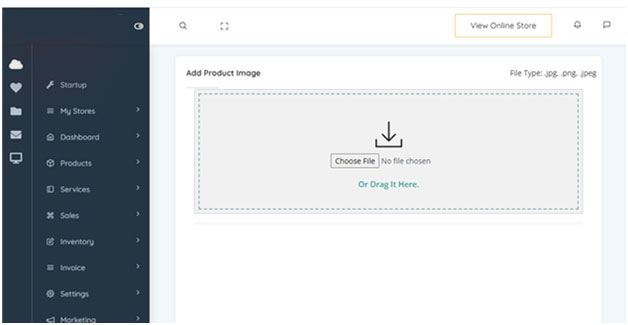
Choose your product image and upload it in the new page appears. After adding the image select and crop the image to continue.
To upload the product, you can add the product name, description, category and pricing details as the basic product details to appear in your online store.
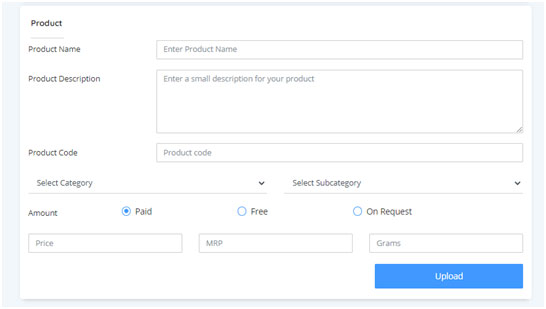
After adding the above details, you can simply click on Upload button to add the product to your store. Thus, your product will be successfully uploaded.
In the All products section of your dashboard you can find the uploaded product.
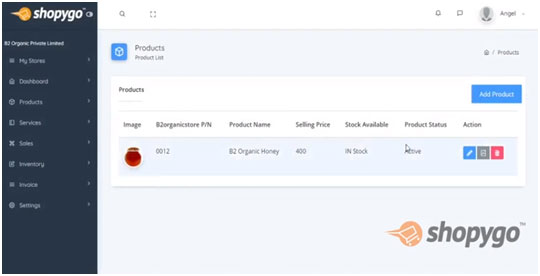
You can simply add unlimited products to your online store by continuing with these steps.


